Acoustic panels are not only effective at reducing noise but also serve as stylish elements in modern interior design. If you're planning to furnish your rooms with modern acoustic panels, you may face a few initial challenges. Besides selecting the most suitable panels, the key tasks are cutting acoustic panels accurately and installing them professionally. Cutting an acoustic panel is no rocket science. We'll show you how to achieve perfect results when cutting acoustic panels.
Content
What You Need for Successfully Cutting an Acoustic Panel
To cut acoustic panels made of a backing layer and wood, you don’t need an extensive range of tools. Here’s what you’ll need:
- Pencil or chalk
- Folding rule or metal measuring tape
- Cutting guide of appropriate length with fixing clamps
- Manual stapler with suitable staples or wood screws
- Flat-head screwdriver
- Jigsaw or circular saw with a fine-tooth blade
- Utility knife
- Fine-grit sandpaper/wood file
- Wooden battens to support either side of the cutting line

For Cut-outs in the Acoustic Panels:
- Hand drill with wood drill bit
- Jigsaw with a fine-tooth wood blade
- Optional: Hole saw for wood
Take Accurate Measurements and Prepare the Cut Precisely
First, decide where and in which direction you want to mount the acoustic panels on the wall. Typically, it will be necessary to cut the panels to the desired size.
Determine where on the wall you want to install the acoustic panels, and mark the respective areas. Then, transfer these measurements onto the back of the acoustic panels. The best tools for this are a soft pencil or chalk.
If there are metal clips fixing the front slats to the backing layer along the cutting line, carefully remove them using a flat-head screwdriver. Then, secure the slats and backing layer with a stapler or suitable wood screws next to the cutting line to ensure the necessary stability.
If cut-outs for sockets, light switches, or other elements are required, follow the instructions later in this guide.
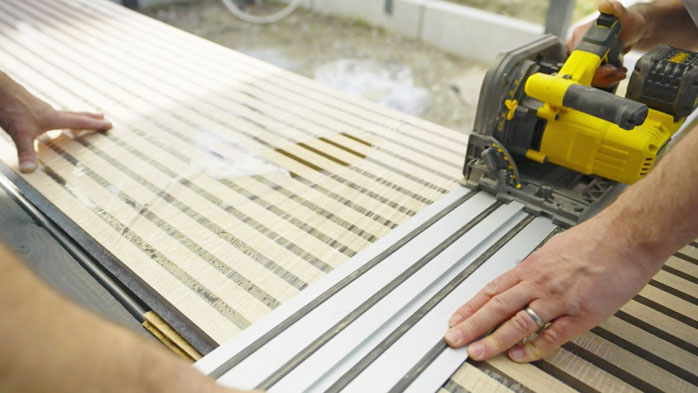
Once all preparations for cutting acoustic panels are complete, it’s time to start sawing. Lay the acoustic panels flat on a stable surface. To protect your work surface, place wooden battens approximately two centimetres thick on either side of the cutting line.
For accurate results, it’s advisable to secure a cutting guide near the cutting line using clamps. The distance between the guide and the cutting line depends on the space between the saw blade and the edge of the guide on your jigsaw or circular saw. Use a fine-tooth blade.

Perfectly Cutting an Acoustic Panel with a Jigsaw
For a clean cut finish on the visible side of the acoustic panels, it’s best to cut from the back. Insert a fine-tooth blade for wood into the jigsaw, set it to a medium-to-high stroke rate, and apply moderate feed speed. Switch on the jigsaw and guide it steadily along the cutting line, following the cutting guide.
After cutting the acoustic panels, turn them over and remove any burrs from the visible wood slats. This can be done using fine-grit sandpaper or a sharp utility knife.
If you only need to cut through the acoustic layer between the wooden slats (a longitudinal cut), a sharp utility knife will suffice.
The best way to shorten acoustic panels is with a circular saw fitted with a fine-tooth wood blade, achieving excellent results. However, cutting acoustic panels can also be done with a jigsaw. There’s no need to purchase a circular saw if you already own a jigsaw.

Creating Cut-outs in Acoustic Panels with a Jigsaw
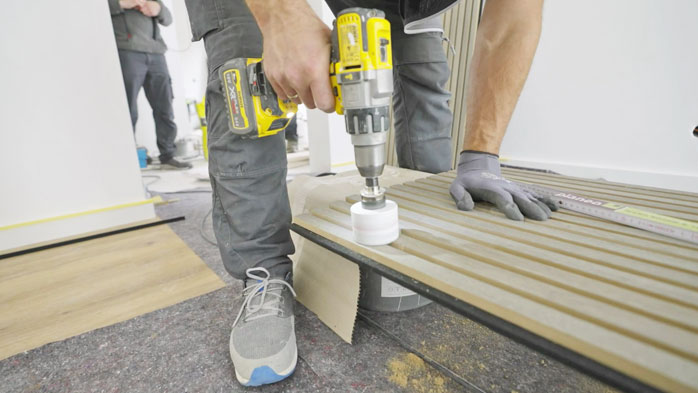
Cutting out spaces for sockets or light switches requires extra care. After marking the positions, you can pre-cut the backing layer using a utility knife. Ensure no metal clips are along the cutting line. Drill a hole in the panel using a wood drill bit; its diameter should be slightly larger than the saw blade thickness. This will serve as the starting point for sawing a circle with the jigsaw. Use a fine-tooth wood blade and cut along the line with steady movement and light pressure. The edges of the cut can be smoothed as previously described. For precise circular cut-outs, a hole saw with the desired diameter can be used.
For rectangular cut-outs, drill a hole at each corner of the section to be removed. This makes it easy to cut three-, four-, or multi-sided shapes using a jigsaw. The edges can then be finished with a fine wood file or fine-grit sandpaper on a sanding block. Successfully cutting acoustic panels and enjoying the results is within reach for DIY enthusiasts with the right tools. In the end, you’ll benefit from the unique design possibilities and acoustic effects of modern acoustic panels, which you can cut and install yourself. For more information on mounting acoustic panels, check out our other guide.
Experience the best service with planeo - because you need it!
No matter what challenges you face with your project, planeo provides you with the right solution. Benefit from the advantages of our services:
- Free samples⁴ for many of our products: Order up to 7 free samples, such as our acoustic panels or other wall coverings.
- Express delivery² - for urgent projects and quick decisions.
- Expert advice¹ - We offer professional consultation through our contact page or answer your questions directly in the comments.
These topics might also interest you
Acoustic Panels as a Coat Rack: A DIY Project
DIY Wall Panelling: A Guide to Stylish Walls
What Are Acoustic Panels – Focusing on Function and Design
Bathroom Wall Cladding Instead of Tiles – A Tile-Free Approach
Simple and Effective: DIY Acoustic Panels!
Acoustic Panels – Adhesive or Screws: Which Is Better?
Step-by-Step Guide: Install Wall Panels