Many renovate an old guest bathroom last. This is because the guest bathroom is often an overlooked space. It is small, used infrequently, and therefore often considered less important. However, with minimal effort, you can create a pleasant guest bathroom. And the bathroom renovation is really quite simple.
Content
- 1 Designing Guest Bathroom - With Vinyl Instead of Tiles?
- 2 Renovating Guest Bathroom with Vinyl - The Advantages
- 3 Renovating Guest Toilet - Can Vinyl Also Go on the Walls?
- 4 Renovating Guest Bathroom is Even Easier with Click-Vinyl
- 5 Extending Vinyl from Hallway to Guest Bathroom
- 6 Guest Bathroom Renovation with Vinyl in 5 Steps
- 7 What Can a Bathroom Renovation Cost?
- 8 Conclusion
- 9 Experience the best service with planeo - because you need it!
Designing Guest Bathroom - With Vinyl Instead of Tiles?
It is common to use tiles for the guest toilet. However, many now renew the guest bathroom with vinyl. This allows for a unified design of the floor and walls with just one decor.
When designing a guest bathroom today, it is also done for the guest. The guest toilet offers the visitor a moment of appreciation in silence. They should also feel comfortable in the quiet place. Often, the guest toilet is used to judge the host's taste.
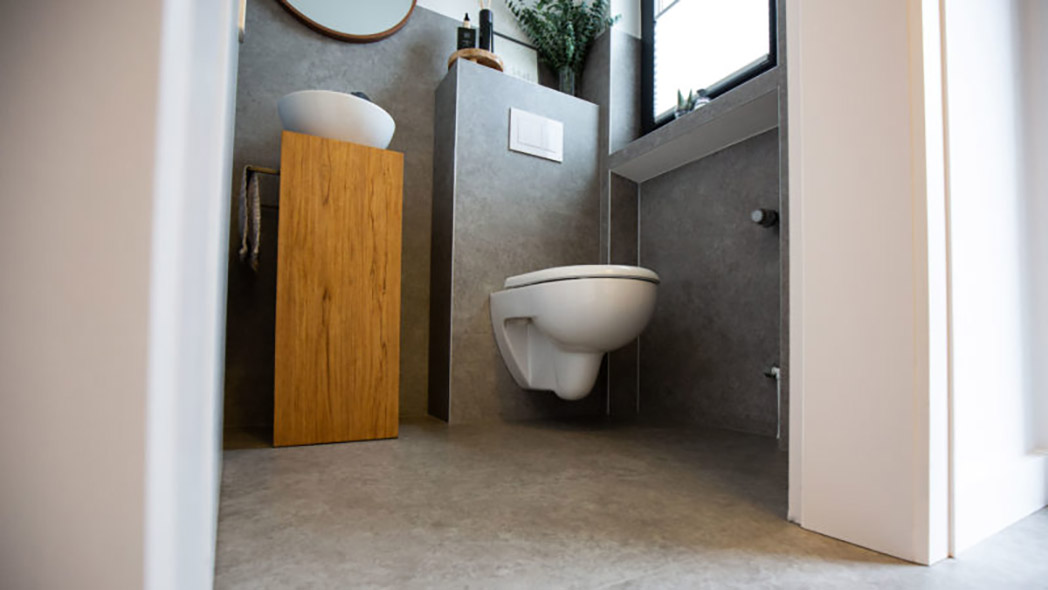
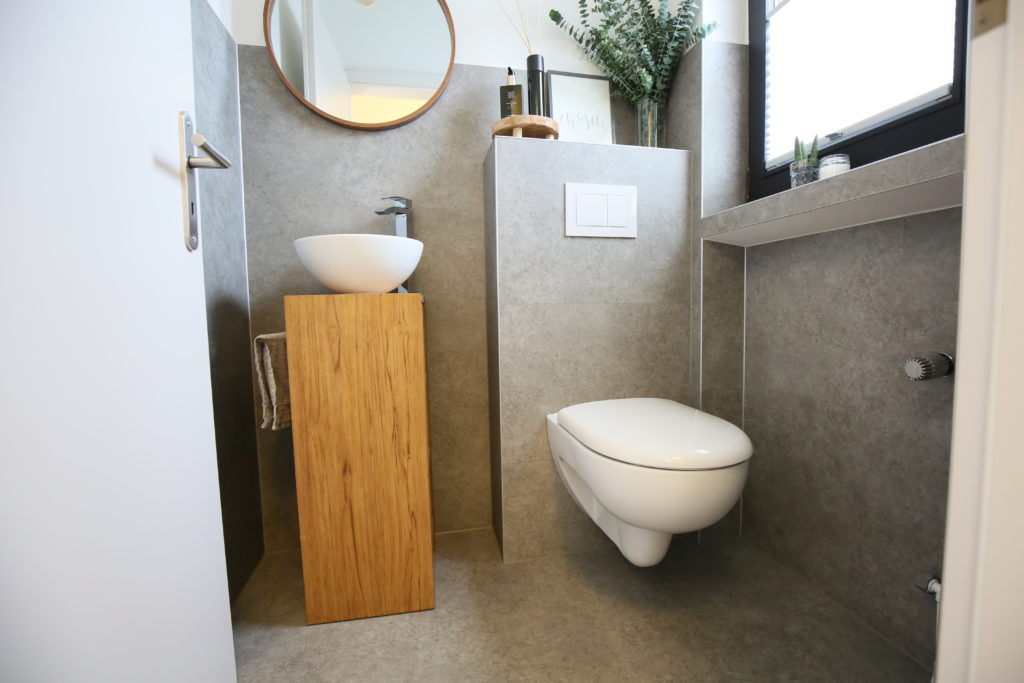
Get inspired. With vinyl, you can very conveniently redesign your guest bathroom. By designing a guest bathroom without tiles, you create a foot-warm space with a wow effect. This will elicit a genuine: "Wow, the guest bathroom looks really good!" from your guests.
When renovating the guest toilet, these requirements usually arise:
- The old guest bathroom should visually form a unit with the adjacent hallway. The flooring in the bathroom and hallway should look the same.
- The bathroom renovation should be done as quickly as possible to avoid blocking the entrance area and adjacent hallway for too long.
- The guest bathroom should meet modern standards. Today’s guest bathroom should be cozy, easy to care for, and inexpensive to renovate.
- Removing old tiles makes a lot of dirt, noise, and extra work. Therefore, they should simply serve as a base for a new covering.
Given these challenges, the question arises: What are the advantages of renovating the guest bathroom with vinyl?
Renovating Guest Bathroom with Vinyl - The Advantages
Renovating the bathroom with vinyl is a new idea for most people. Therefore, it is good to be aware of the benefits of vinyl in bathrooms and toilets.
Renovating the guest bathroom with vinyl includes these advantages:
- Renovation with vinyl is easy. With vinyl, you can renovate your guest bathroom yourself. Whether you click or glue vinyl in the guest bathroom, you need few tools and little experience.
- The vinyl floor allows you to create an attractive and unified guest bathroom design from one material. You can even lay the hallway with the same decor.
- In important aspects, vinyl is superior to tiles. Vinyl feels warm, which is very pleasant when touching the floor and walls.
- Vinyl is an elastic covering and dampens noise. A quieter guest bathroom will also be appreciated by the guest.
Renovating Guest Toilet - Can Vinyl Also Go on the Walls?
Sticking vinyl to the wall is easy. The simplest method is with a contact adhesive that coats both sides. This is a clean affair and prevents the planks from slipping while sticking. Depending on the substrate, it may also be necessary to smooth the surface in advance with a suitable filler.
So why not dare to do something new when renovating the guest bathroom? Typical substrates for vinyl in the bathroom are old tiles or painted walls. An important prerequisite for an optimal result is that the surfaces are smooth and even. Because adhesive vinyl is thin and has no tongue-and-groove connection, sandy plaster or peeling paint needs pre-treatment. This ensures a perfect result.
The individual steps are easy to implement. Therefore, feel free to apply vinyl to the walls of your guest bathroom. Cover your bathroom walls with the same vinyl as the floor and adjacent hallway. Marvel at the pleasant room effect when you design walls and floor alike.
Renovating Guest Bathroom is Even Easier with Click-Vinyl
The easiest way to carry out the "guest toilet renovation" project is with click-vinyl.
Why is renovating a guest bathroom with click-vinyl less effort? Firstly, the preparation effort is very low. You can even skip filling the tiles if the joints are not too wide. Moreover, with click-vinyl, you can re-lay the floor in the guest bathroom in no time.
This of course refers to solid click-vinyl. Because in addition to adhesive vinyl in the bathroom, this waterproof type of click vinyl is also suitable for renovating the guest bathroom. You only need a suitable vinyl floor underlay to achieve an optimal result.
Positive customer experiences with vinyl in the bathroom are regularly shared with us. Our own test attempts with standing water on click-vinyl also showed very good results over many hours. Therefore, concerns about water seeping into the click connection with solid click-vinyl are unfounded.
When laying click-vinyl in the bathroom, consider these tips:
- Use only waterproof solid click-vinyl. Take advantage of the free sample service at www.planeo.com. You will receive your personal selection at home for viewing.
- Make sure to use the correct impact sound insulation for vinyl.
- Check whether the old tiles or another substrate are even and firm enough.
- Do not forget to ensure proper sealing.
- All silicone joints are not permanently sealed. They must be maintained from time to time.
- For wall connections, fill the expansion joint with a backer rod before sealing with silicone.
Extending Vinyl from Hallway to Guest Bathroom
In most homes, the hallway and guest bathroom are adjacent. Many find the mix of different materials, as was done in the past, disturbing. In times of minimalism and clean lines, many opt for unified guest bathroom design. This includes connecting to the hallway.
Vinyl is ideally suited for use in both the hallway and the guest bathroom. Furthermore, you can easily extend the same vinyl onto the walls. This allows for a bathroom design with one material for floor and walls.
By using just one vinyl for the hallway and guest bathroom, you achieve:
- A cohesive overall appearance
- A consistent and modern look
- A harmonious atmosphere in the reception area
- Rooms that appear more spacious even with few square meters
- Easier maintenance in the long run
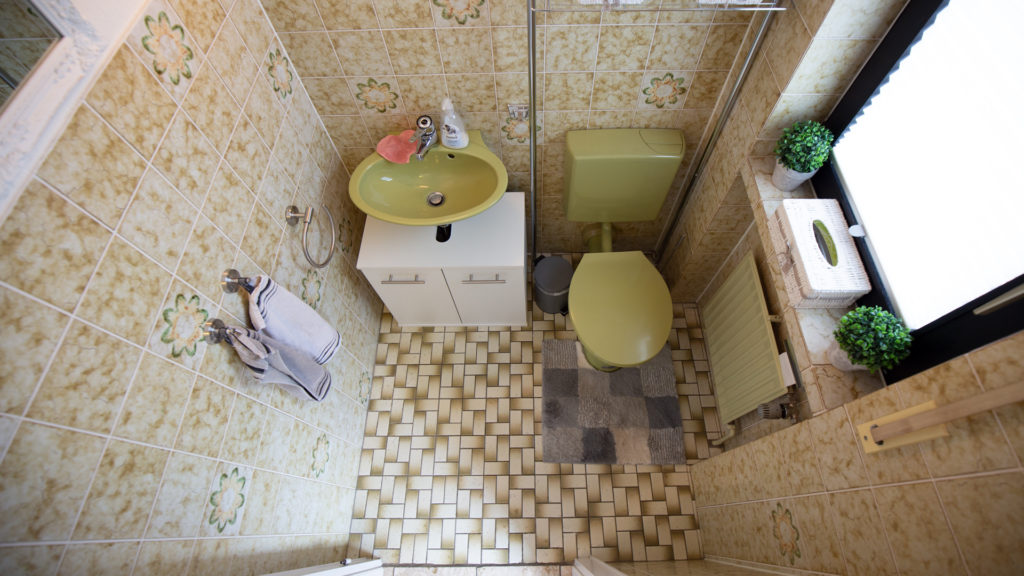
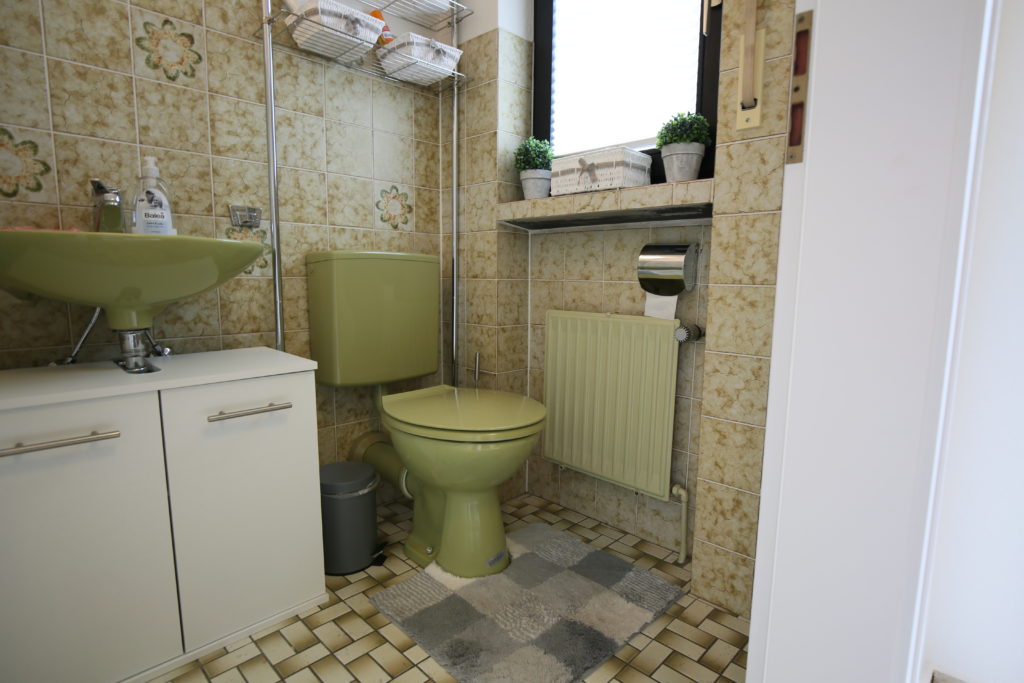
And this is how the colorful mix looks before and the unified guest bathroom design with vinyl after.
Guest Bathroom Renovation with Vinyl in 5 Steps
We show in the following video how to renovate the guest bathroom with adhesive vinyl in 5 simple steps. The effort is kept as low as possible since we use the old tiles as a base. Thus, the bathroom renovation is possible without a major construction site.
These are the important steps for renovating the guest bathroom and the adjacent hallway with adhesive vinyl:
- STEP – Remove everything that gets in the way for preparation Empty the guest bathroom. Remove obstructive fittings, adhesive residues, and silicone. Clean away dirt and grease with a base cleaner. Tape off all edges that you do not need to fill.
- STEP – Prepare wall surfaces and edges for adhesion Smooth the wall tiles completely with cement filler. This prepares a perfect surface for adhesive vinyl. Then install aluminum corner profiles matching the thickness of the planned adhesive vinyl. Afterward, fill the profiles flush in a second pass.
- STEP – Prepare the floor surface and pre-wall installation Clean and prime the floor surface. Since the adjacent hallway receives the same vinyl, we level the height with leveling compound. Then the installation for the flush-mount cistern can be carried out. After the drywall cladding, fill everything flush. Sand away the last unevenness and vacuum.
- STEP – Adhere vinyl to the walls Apply the contact adhesive to both the substrate and the back of the vinyl with a roller or brush. Align the pre-cut vinyl planks straight when sticking. Press the planks into place with the palm of your hand.
- STEP – Adhere vinyl to the floor Shorten the doorframes for the floor installation. Clean the floor again. Lay out the vinyl planks completely and cut them to size. Adhere the pre-cut vinyl planks as far as you can apply adhesive. Do not forget to roll the planks after laying them in the fresh adhesive. Finally, seal the joints with silicone.
What Can a Bathroom Renovation Cost?
Renovating a bathroom with vinyl costs less than you might think. When considering the effort, include not only material costs. Count also the time. It is either your time or that of the tradesperson.
The following table provides a rough overview of the costs for renovating a bathroom with vinyl:
Click-Vinyl in the Bathroom – Floor
| Planeo Click Vinyl | Price € / unit | 3m² | 6m² | 9m² | 12m² | 15m² |
|---|---|---|---|---|---|---|
| Planeo Click Vinyl | 21.90 | 96.36 | 144.54 | 240.90 | 289.08 | 385.44 |
| Planeo Silence Underlay | 54.90 | 54.90 | 54.90 | 54.90 | 109.80 | 109.80 |
| Backer Rod | 10 | 10 | 10 | 20 | 20 | 30 |
| Silicone | 10 | 10 | 10 | 20 | 20 | 30 |
| Optional | ||||||
| Filler | 40 | 40 | 40 | 80 | 80 | 120 |
| Total Cost in € | 171.26 | 229.44 | 345.80 | 448.88 | 555.24 |
Material costs including accessories in € for laying click-vinyl in the bathroom - excluding tools and tradesperson costs.
Adhesive Vinyl in the Bathroom – Floor
| Planeo Adhesive Vinyl | Price € / unit | 3m² | 6m² | 9m² | 12m² | 15m² |
|---|---|---|---|---|---|---|
| Planeo Adhesive Vinyl | 15.90 | 53.42 | 105.58 | 160.27 | 213.70 | 267.12 |
| Vinyl Adhesive | 49.98 | 49.98 | 49.98 | 49.98 | 49.98 | 49.98 |
| Primer | 61.95 | 61.95 | 61.95 | 61.95 | 61.95 | 61.95 |
| Filler | 40.00 | 40.00 | 40.00 | 80.00 | 80.00 | 120.00 |
| Silicone | 10.00 | 10.00 | 20.00 | 30.00 | 30.00 | 40.00 |
| Total Cost in € | 215.35 | 277.51 | 382.20 | 435.53 | 539.05 |
Material costs including accessories in € for laying adhesive vinyl in the bathroom - excluding tools and tradesperson costs.
Floating Adhesive Vinyl in the Bathroom – Floor
| Planeo Adhesive Vinyl | Price € / Unit | 3m² | 6m² | 9m² | 12m² | 15m² |
|---|---|---|---|---|---|---|
| Planeo Adhesive Vinyl | 15.90 | 53.42 | 105.58 | 160.27 | 213.70 | 267.12 |
| Planeo Silent Stick Adhesive Underlay | 69.50 | 69.50 | 69.50 | 139.00 | 139.00 | 208.50 |
| Silicone | 10.00 | 10.00 | 20.00 | 30.00 | 30.00 | 30.00 |
| Backer Rod | 10.00 | 10.00 | 20.00 | 20.00 | 20.00 | 30.00 |
| Optional | ||||||
| Filler | 40.00 | 40.00 | 40.00 | 80.00 | 80.00 | 120.00 |
| Total Costs in € | 142.92 | 205.08 | 349.27 | 402.70 | 535.62 |
Material costs including accessories in € for laying floating adhesive vinyl in the bathroom - excluding tools and tradesperson costs.
Adhesive Vinyl in the Bathroom – Wall
| Example Planeo Adhesive Vinyl | Price € / unit | 9m² | 12m² | 15m² | 18m² | 21m² |
| Planeo Adhesive Vinyl | 15.90 | 53.42 | 105.58 | 160.27 | 213.70 | 267.12 |
| Contact Adhesive | 24.95 | 74.85 | 99.80 | 124.75 | 149.70 | 174.65 |
| Special Wall Filler | 49.00 | 49.00 | 49.00 | 49.00 | 98.00 | 98.00 |
| Corner Profiles | 7.60 | 57.00 | 76.00 | 95.00 | 114.00 | 113.00 |
| Mounting Adhesive for Profiles | 15.00 | 15.00 | 15.00 | 15.00 | 15.00 | 15.00 |
| Silicone | 10.00 | 20.00 | 20.00 | 30.00 | 30.00 | 40.00 |
| Total Costs in € | 376.12 | 471.91 | 580.87 | 726.93 | 833.98 |
Material costs including accessories in € for laying adhesive vinyl in the bathroom on the wall - excluding tools and tradesperson costs.
Conclusion
Renovating a guest bathroom with vinyl is a simple and cost-effective solution that is both stylish and functional. Vinyl offers many advantages, such as easy installation, pleasant warmth, and noise dampening. With just a few tools and little experience, you can uniformly design both the floor and walls of your guest bathroom, creating a harmonious atmosphere. The quick and straightforward renovation process will make your guest bathroom look modern and inviting, providing your guests with a pleasant experience.
Experience the best service with planeo - because you need it!
No matter what challenges you face with your project, planeo provides you with the right solution. Benefit from the advantages of our services:
- Free samples⁴ for many of our products: Order up to 7 samples at no cost, for instance, of our vinyl floors, click vinyl, adhesive vinyl, or rigid vinyl.
- Express delivery² - for urgent projects and quick decisions.
- Expert advice¹ - We offer professional consultation through our contact page or answer your questions directly in the comments.
These topics might also interest you
Laying vinyl flooring continuously without an expansion joint
Vinyl Flooring Expansion Joint - What to Consider?
What is Vinyl? Clear Explanation for Beginners and Professionals
Laying Vinyl Over Laminate: A Good Way to Save Time and Costs?
Rigid Vinyl (SPC Vinyl) - What makes it so special?
Vinyl flooring on tiles - what you need to know!
Vinyl flooring: Does a high wear layer protect from scratches?
Adhesive vinyl flooring - 4 ways to install adhesive vinyl
Impact sound insulation vinyl - Which vinyl floor underlayment to take?